
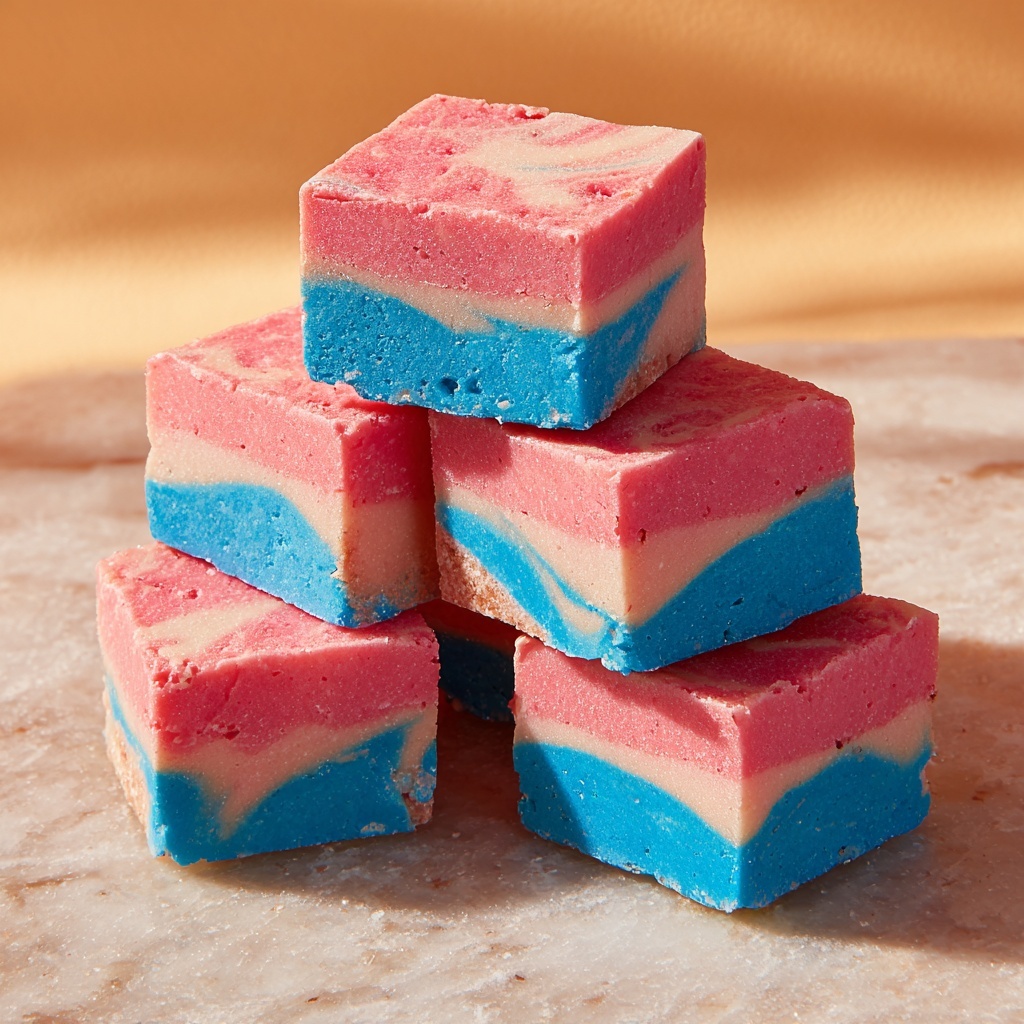
If you have a sweet tooth and a love for whimsical treats, this Homemade Cotton Candy Fudge Recipe is going to be your new favorite indulgence. Imagine the creamy richness of white chocolate fudge perfectly infused with that airy, nostalgic cotton candy flavor and delightful pastel hues swirling through every bite. It’s a playful, eye-catching dessert that’s as fun to make as it is to eat, perfect for celebrations, gifting, or simply brightening up any day. This fudge brings together simple ingredients in a way that transforms your kitchen into a carnival of taste and color.

Ingredients You’ll Need
The magic of this fudge lies in a handful of straightforward ingredients, each playing a crucial role in building its creamy texture and signature cotton candy taste. From the rich base down to the pretty pastel colors, every item is essential to get that perfect melt-in-your-mouth experience.
- Sweetened condensed milk: Acts as the creamy, luscious backbone that binds your fudge smoothly.
- White chocolate chips: Provide the rich, velvety flavor that’s essential for classic fudge texture.
- Cotton candy flavoring: The star ingredient delivering that whimsical, nostalgic taste of carnival cotton candy.
- Gel-based food coloring (pink and blue): Adds the playful pastel swirls that make the fudge look as delightful as it tastes.
- Pink sea salt (optional): A finishing touch that balances sweetness with a subtle salty crunch.
How to Make Homemade Cotton Candy Fudge Recipe
Step 1: Gather Your Ingredients
Start by collecting all your ingredients and setting them out on your counter so everything is within reach. This helps keep your process smooth and stress-free from start to finish.
Step 2: Melt the White Chocolate Chips
Place the white chocolate chips in a microwave-safe bowl and heat them in 30-second bursts, stirring well between each interval. This slow melting ensures your chocolate becomes silky and smooth without burning.
Step 3: Combine with Sweetened Condensed Milk
Once melted, mix in the sweetened condensed milk thoroughly. This creates the fudgy base that is creamy and rich with every spoonful.
Step 4: Add Cotton Candy Flavoring and Color
Stir in the cotton candy flavoring until the whole mixture carries that signature carnival sweetness. Then, add small drops of pink and blue gel food coloring, swirling gently to create beautiful pastel patterns without completely blending the colors.
Step 5: Pour and Set
Pour the vibrant fudge mixture into a lined 8×8-inch baking pan and smooth the top with a spatula. This will ensure even cooling and an attractive surface once set.
Step 6: Chill until Firm
Refrigerate the fudge for at least 2 hours, allowing it to firm up perfectly. When it’s solid, cut into squares that reveal the pretty swirls and get ready to delight in every bite!
How to Serve Homemade Cotton Candy Fudge Recipe
Garnishes
Sprinkle a pinch of pink sea salt on top before cutting to add a surprising crunch and a flavor boost that complements the sweetness. For extra whimsy, add edible glitter or tiny pastel sprinkles that echo the cotton candy theme.
Side Dishes
This fudge shines on its own as a sweet treat, but pairing it with a light fruit salad or a scoop of vanilla bean ice cream can balance the richness beautifully. It’s also a fun companion for a casual tea party or a festive celebration dessert table.
Creative Ways to Present
Wrap individual fudge squares in pastel-colored wax paper tied with ribbon for personalized party favors or gifts. Alternatively, arrange a colorful platter with alternating pink and blue fudge pieces to wow your guests with a cotton candy-themed spread.
Make Ahead and Storage
Storing Leftovers
Store any leftover fudge in an airtight container at room temperature for up to a week. Keep it cool and dry to maintain its soft, creamy texture and vibrant colors.
Freezing
If you want to save your homemade cotton candy fudge recipe for longer, place the pieces in a freezer-safe bag or container. They freeze well for up to 3 months, making this a fantastic make-ahead treat for future cravings.
Reheating
While fudge is best enjoyed cold or at room temperature, if it becomes too hard from the fridge or freezer, let it sit out for about 15 minutes before eating. Avoid microwaving as it can alter the texture and cause the fudge to sweat.
FAQs
Can I use regular food coloring instead of gel-based?
Gel-based coloring is preferred because it provides vibrant colors without thinning your fudge mixture. Regular food coloring contains more liquid, which might affect the fudge’s consistency.
Is the cotton candy flavoring natural?
Cotton candy flavoring is usually a synthetic blend designed to mimic the sweet, airy taste of real cotton candy. You can find both natural and artificial options depending on your preference.
Can I substitute white chocolate chips with another type of chocolate?
For this specific fudge, white chocolate chips are essential to maintain the light color and creamy texture that pairs perfectly with cotton candy flavor. Other chocolates will change both taste and appearance.
How do I get the perfect swirl effect with the food coloring?
Add drops of pink and blue gel food coloring after flavoring, then use a skewer or toothpick to gently swirl the colors through the fudge batter. Avoid overmixing to keep distinct pastel patterns.
Is it okay to skip the pink sea salt?
Definitely! Pink sea salt is optional and adds a gourmet touch. Your fudge will still be deliciously sweet and creamy without it.
Final Thoughts
Making this Homemade Cotton Candy Fudge Recipe brings a little sweetness and magic into your kitchen, capturing the joy and fun of carnival treats in an easy, delectable form. It’s a recipe that’s both charming and straightforward, perfect for sharing with friends, gifting, or savoring during cozy moments. I encourage you to try it soon—you’ll be amazed how something so simple can turn your taste buds into a festive celebration!
Print
Homemade Cotton Candy Fudge Recipe
- Prep Time: 5 minutes
- Cook Time: 10 minutes
- Total Time: 15 minutes plus 2 hours chilling
- Yield: 16 servings
- Category: Dessert
- Method: No-Cook
- Cuisine: American
Description
This Homemade Cotton Candy Fudge combines creamy white chocolate with sweetened condensed milk and a fun cotton candy flavor, creating a silky, colorful treat perfect for parties or a sweet indulgence. Easy to make with simple ingredients and no baking required, it’s a delightful twist on classic fudge with vibrant pink and blue hues and an optional sprinkle of pink sea salt for a subtle contrast.
Ingredients
Fudge Mixture
- 1 can (14 oz) sweetened condensed milk
- 2 cups white chocolate chips
- 1 tsp cotton candy flavoring
- Gel-based food coloring (pink and blue), as desired
Topping (Optional)
- Pink sea salt, for sprinkling
Instructions
- Prepare Ingredients: Gather all ingredients on your counter for easy access to streamline the fudge-making process.
- Melt Chocolate: Place the white chocolate chips in a microwave-safe bowl. Heat in the microwave in 30-second intervals, stirring well after each, until the chocolate is fully melted and smooth.
- Combine Milk and Chocolate: Add the sweetened condensed milk to the melted white chocolate. Stir thoroughly until the mixture is silky and completely combined, ensuring there are no lumps.
- Flavor and Color: Stir in the cotton candy flavoring and add gel-based food coloring drops, alternating pink and blue to achieve the desired cotton candy look. Mix until the colors and flavor are evenly distributed.
- Set in Pan: Pour the fudge mixture into an 8×8-inch baking pan lined with parchment or wax paper. Use a spatula to smooth the surface evenly.
- Chill: Refrigerate the pan for at least 2 hours or until the fudge is firm enough to cut.
- Serve: Once set, cut the fudge into 16 squares. Optionally, sprinkle with pink sea salt before serving for a touch of contrast.
Notes
- Use gel-based food coloring to avoid altering the fudge consistency.
- Microwave heating times may vary; stir frequently to prevent burning.
- Allow the fudge to fully cool and set in the refrigerator before cutting for clean squares.
- Pink sea salt enhances the sweet and savory balance but can be omitted if preferred.
- Store fudge in an airtight container in the refrigerator for up to one week.


