
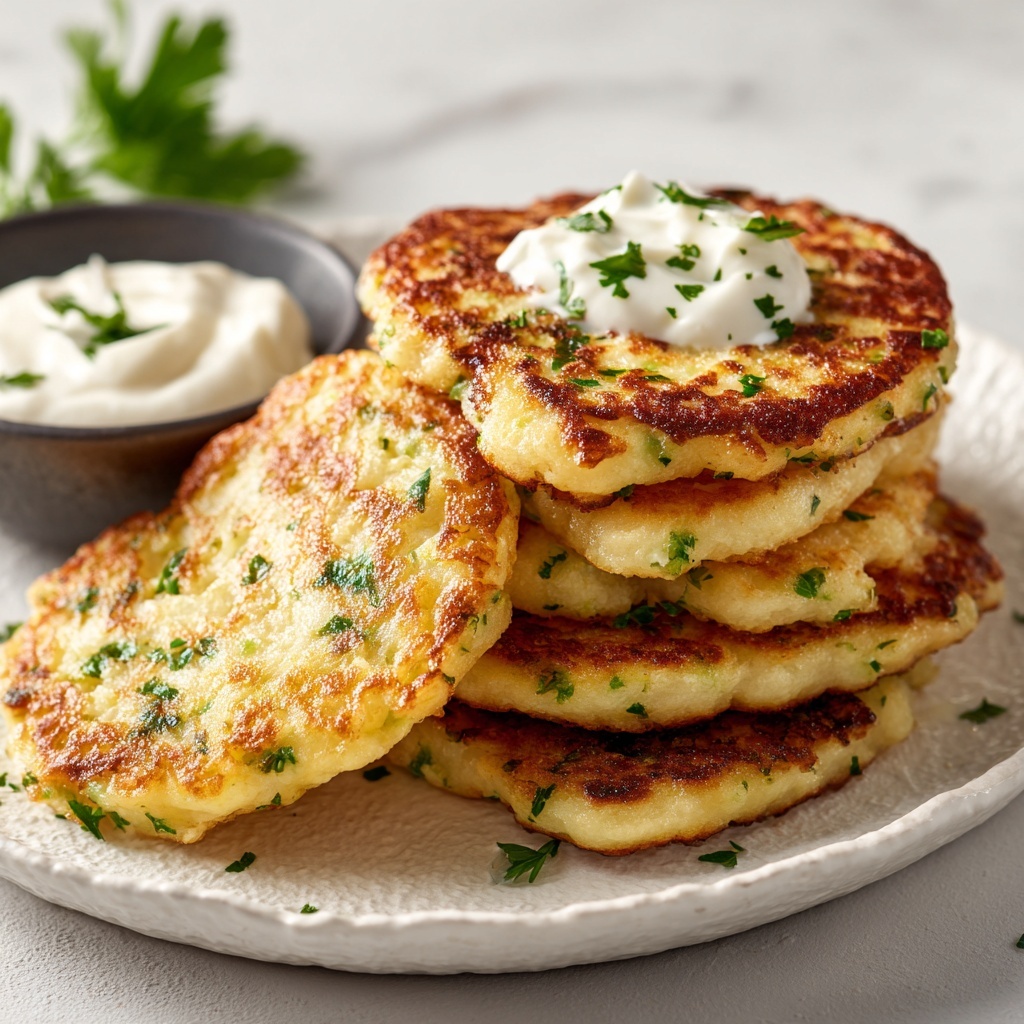
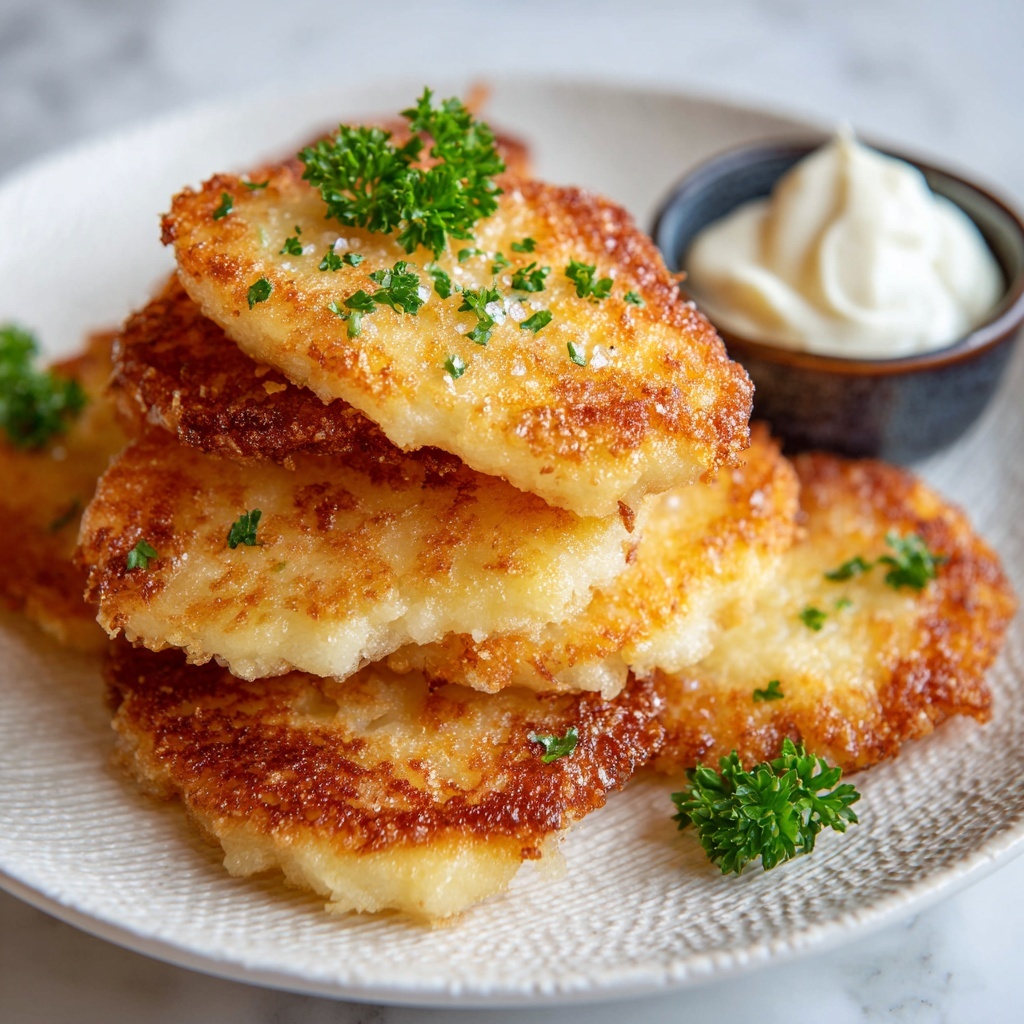
If you have a soft spot for golden, crispy, and cheesy breakfast treats, you’re absolutely going to love this Crispy Cheesy Hash Browns Recipe. It’s the perfect harmony of crunchy edges and melty cheddar that comes together with simple ingredients to make each bite irresistibly satisfying. Whether you’re looking for a comforting weekend brunch or a crowd-pleaser side dish, this recipe brings warmth and a burst of flavor to your table effortlessly.
Ingredients You’ll Need
This recipe calls for a handful of straightforward ingredients that each play a crucial role in building the perfect texture and taste. They’re easy to find and combine to create that trademark crispy exterior while keeping the inside cheesy and tender.
- Frozen shredded hash browns: Using thawed and well-drained hash browns ensures you get that crispy finish rather than soggy.
- Shredded cheddar cheese: Sharp cheddar melts beautifully and adds a rich, tangy flavor that’s simply divine.
- Finely diced onion: Adds a subtle sweetness and a little depth to every bite.
- Melted butter: Acts as a flavor enhancer while helping bind the mixture gently.
- Olive oil: Provides healthy fat and aids in crisping the hash browns perfectly on the outside.
- Salt and pepper: Basic seasonings that bring out the flavors and balance the dish.
- Nonstick cooking spray or parchment paper: Makes cleanup easy and prevents sticking for a flawless crust.
How to Make Crispy Cheesy Hash Browns Recipe
Step 1: Preheat the Oven
Start by preheating your oven to 400°F (200°C). This is essential to ensure the hash browns bake evenly and the cheese melts into that lovely golden layer we all crave. Line a baking sheet with foil and then coat it with nonstick spray or cover with parchment paper to keep everything from sticking.
Step 2: Mix the Ingredients
In a large mixing bowl, toss together the thawed and drained hash browns with shredded cheddar, diced onion, melted butter, olive oil, and a generous pinch of salt and pepper. Stir gently but thoroughly, making sure every shred is coated with butter and cheese for maximum flavor and crispiness.
Step 3: Shape and Spread
Transfer the mixture onto your prepared baking sheet. Use a spatula to spread it out evenly and press down just slightly—this helps the hash browns bind together and bake with a beautifully compact texture. Think of it like forming a cheesy, golden blanket that’s ready to crisp up in the oven.
Step 4: Bake to Perfection
Bake for about 25 to 30 minutes until the edges turn a deep golden brown and develop that crave-worthy crisp. If you want to elevate the crunch and give the surface an extra golden touch, switch to broil for 2 to 3 minutes at the end, keeping a close eye to avoid burning.
Step 5: Serve
Once baked, let the hash browns cool for a few minutes—this helps them set up nicely for slicing. Then cut into squares or wedges and get ready to enjoy that iconic crispy-cheesy goodness.
How to Serve Crispy Cheesy Hash Browns Recipe
Garnishes
Sprinkle chopped fresh herbs like chives or parsley over the top for a colorful, fresh pop. A dollop of sour cream or a drizzle of hot sauce can add an exciting zing to complement the cheesy richness.
Side Dishes
These hash browns pair wonderfully with eggs cooked any style, crispy bacon, or even a simple green salad for a lighter balance. They hold their own alongside hearty breakfasts or brunch spreads, making them a versatile staple.
Creative Ways to Present
For a fun twist, turn your Crispy Cheesy Hash Browns Recipe into sliders by sandwiching hash brown squares with ham and a fried egg. Or use cookie cutters to create festive shapes for holiday breakfasts. The possibilities are as tasty as they are creative!
Make Ahead and Storage
Storing Leftovers
If you have any leftovers (which might be tough!), store them in an airtight container in the refrigerator for up to 3 days. The hash browns will hold their flavor but might lose some crispiness.
Freezing
You can freeze portions of this dish by wrapping cooled squares tightly in plastic wrap and then placing them in a freezer-safe bag. Freeze for up to 1 month to enjoy later without compromising much on texture.
Reheating
The best way to reheat leftover crispy cheesy hash browns is in a toaster oven or on a baking sheet in the oven at 350°F (175°C). This helps bring back the crunch better than a microwave, which can make them soggy.
FAQs
Can I use fresh potatoes instead of frozen hash browns?
Absolutely! Just make sure to grate the potatoes finely and squeeze out as much moisture as possible before mixing with the other ingredients to achieve that crispy texture.
What type of cheese works best in this recipe?
Cheddar is classic, but you can experiment with mozzarella for gooeyness or a sharper cheese like Parmesan for a nutty flavor. Just adjust the amount to your taste.
Is it possible to make this recipe dairy-free?
Yes! Substitute the cheese with a dairy-free alternative and use olive oil or a plant-based butter instead of regular butter to keep it flavorful and crispy.
Can I bake these in a muffin tin instead of a baking sheet?
You can, and it’s a neat way to make individual portions! Just grease the muffin tin well and reduce the baking time slightly—around 20 minutes should do the trick.
How do I prevent the hash browns from becoming soggy?
Ensuring the frozen hash browns are fully thawed and thoroughly drained before mixing is key. Pressing the mixture firmly on the baking sheet and using enough fats like butter and oil also help make the exterior crispy.
Final Thoughts
This Crispy Cheesy Hash Browns Recipe is one of those dishes that feels like a warm hug from the inside out. It’s simple, satisfying, and easily adaptable to your own tastes or ingredient availability. Once you try it, you’ll understand why it quickly becomes a beloved classic that’s perfect for breakfast, brunch, or any time you crave that perfect crispy-cheesy goodness.
Print
Crispy Cheesy Hash Browns Recipe
- Prep Time: 10 minutes
- Cook Time: 30 minutes
- Total Time: 40 minutes
- Yield: 6 servings
- Category: Side Dish
- Method: Baking
- Cuisine: American
Description
These Crispy Cheesy Hash Browns are a delicious and easy-to-make breakfast or side dish made with frozen shredded potatoes, cheddar cheese, and onions, baked to perfection for a golden and crispy texture. Perfect for a comforting and savory meal that the whole family will love.
Ingredients
Hash Browns Mixture
- 1 (22 oz) bag frozen shredded hash browns, thawed and well-drained
- 1½ cups shredded cheddar cheese
- ¼ cup finely diced onion
- 2 tablespoons melted butter
- 2 tablespoons olive oil
- Salt and pepper, to taste
For Baking
- Nonstick cooking spray
- Foil or parchment paper for lining the baking sheet
Instructions
- Preheat the oven: Preheat your oven to 400°F (200°C). Prepare a baking sheet by lining it with foil or parchment paper, then coat it lightly with nonstick cooking spray to prevent sticking.
- Mix ingredients: In a large mixing bowl, combine the thawed and well-drained shredded hash browns, shredded cheddar cheese, finely diced onion, melted butter, olive oil, and season with salt and pepper to taste. Stir everything together thoroughly until all ingredients are evenly distributed.
- Shape and spread: Transfer the mixture to the prepared baking sheet. Spread it out evenly and use a spatula to gently press it down, compacting the mixture slightly to help it hold together during baking.
- Bake: Place the baking sheet in the oven and bake for 25 to 30 minutes, or until the edges are a deep golden brown and crispy. For an extra crispy finish, switch the oven to broil and cook for an additional 2 to 3 minutes, keeping a close eye to avoid burning.
- Serve: Remove from the oven and allow the crispy cheesy hash browns to cool slightly. Cut into squares or wedges before serving warm. Enjoy as a hearty breakfast side or a delicious snack.
Notes
- Ensure the hash browns are well-thawed and drained to avoid excess moisture.
- You can substitute cheddar cheese with your preferred cheese for variation.
- Broiling at the end adds extra crispiness—watch carefully to prevent burning.
- Serve with ketchup, sour cream, or your favorite breakfast sauces.
- This recipe can be doubled for larger gatherings but may require longer baking time.


