
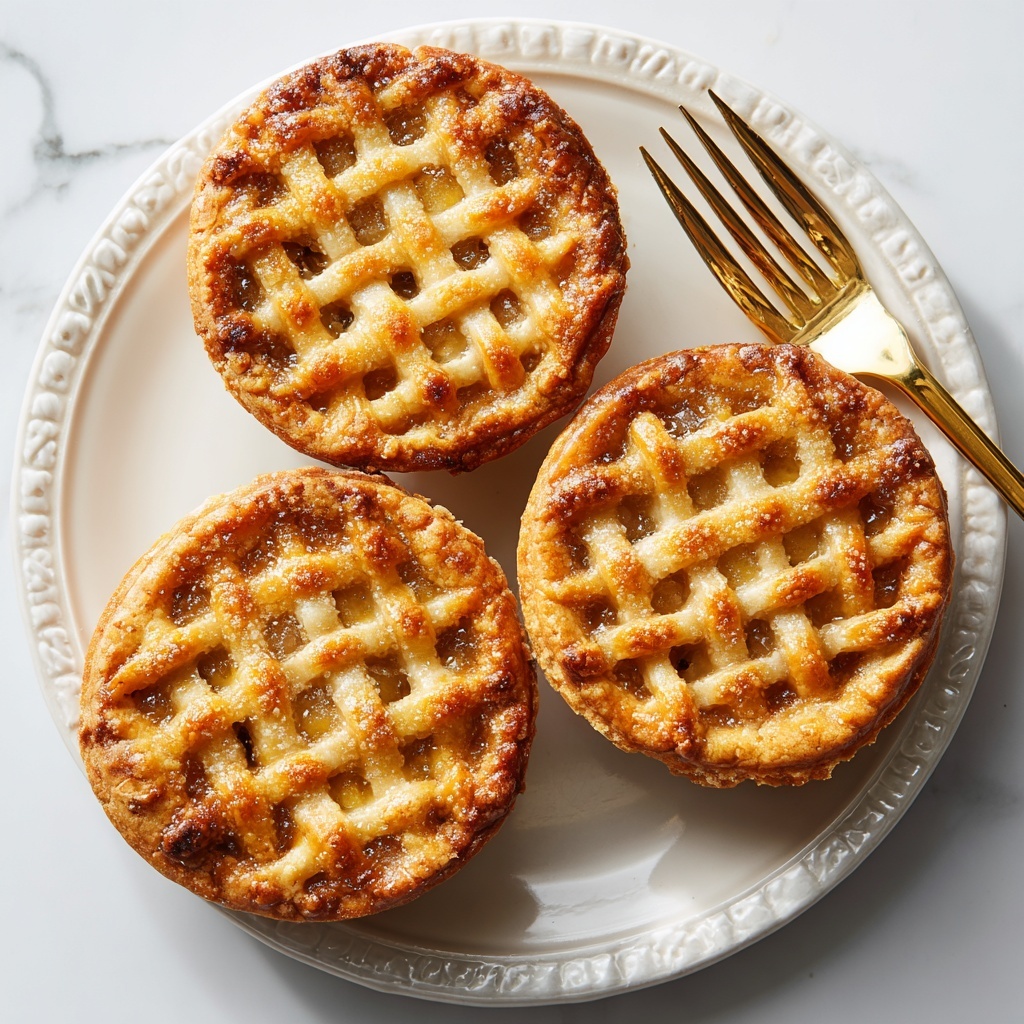
If you’ve ever dreamed of enjoying the classic comfort of apple pie but wished it came in a perfectly portioned, adorable size, then you’re in for a treat! This Mini Apple Pies in Muffin Tins Recipe captures all the cozy, cinnamon-spiced goodness of traditional apple pie and fits it snugly into a muffin tin for the ultimate personal dessert experience. Flaky crusts wrap around tender, sweet apple filling with just the right amount of spice, making each bite a little pocket of autumnal joy that’s as charming as it is delicious.

Ingredients You’ll Need
Gathering the right ingredients is your first step toward these mouthwatering mini apple wonders. Each component plays a crucial role, from the buttery pie crust that provides a flaky base, to the mix of spices that dances with the natural sweetness of the apples.
- Pie crusts (2, homemade or store-bought): Your buttery, flaky canvas for this recipe; homemade crust adds extra love but store-bought works beautifully too.
- Chopped apples (2 ½ cups, about 315 grams): Choose crisp varieties like Granny Smith or Honeycrisp for the perfect balance of tartness and sweetness.
- Granulated sugar (¼ cup, 50 grams): Sweetens the filling just right without overpowering the apples.
- All-purpose flour (2 tablespoons, 15 grams): Helps thicken the filling so it’s nice and luscious inside the crust.
- Ground cinnamon (1 teaspoon): The warm spice that brings the filling to life with cozy autumn vibes.
- Pure vanilla extract (1 teaspoon): Adds a subtle depth of flavor, rounding out the spices with gentle sweetness.
- Ground nutmeg (⅛ teaspoon): A pinch goes a long way to enhance the aromatic spice profile.
- Unsalted butter (1 tablespoon, 15 grams, optional): Dotting the filling with butter enriches the flavor and creates a silky finish.
How to Make Mini Apple Pies in Muffin Tins Recipe
Step 1: Prepare the Oven and Your Tools
Begin by preheating your oven to 425°F (220°C). This high temperature helps the crust turn gorgeously golden and crisp while the filling bubbles up inside. Lightly flour your work surface to keep the dough from sticking as you roll it out.
Step 2: Roll and Cut the Pie Crust
Roll each pie crust out to about 1/8 inch thickness—thin enough to become beautifully flaky but sturdy enough to hold the filling. Using a 3.5-inch cookie cutter or a simple cup, cut out 12 circles. Don’t worry about scraps; you can re-roll them gently to get all the circles you need without wasting dough.
Step 3: Shape the Mini Pie Shells
Carefully place each dough circle into the cups of a standard 12-count muffin pan, pressing gently so the dough forms a snug little shell. This step ensures your mini pies will hold their shape during baking. Once all shells are in place, pop the entire pan, along with any leftover crust, into the refrigerator to chill while you prepare the filling.
Step 4: Prepare the Apple Filling
In a large mixing bowl, combine the chopped apples, sugar, flour, cinnamon, vanilla extract, and nutmeg. Stir everything together until the apples are evenly coated in the sweet and spicy mixture. This filling will be the star of your mini pies, so make sure every apple piece is dressed beautifully.
Step 5: Fill the Pie Shells
Take your muffin pan out of the refrigerator and evenly spoon about 3 tablespoons of the apple filling into each dough-lined cup. Filling them generously ensures every bite bursts with flavor.
Step 6: Add Butter to Finish
If you’re using butter, dice it into 12 small cubes and place one on top of the apple mixture in each mini pie. This little extra touch melts into the filling while baking, adding a rich silkiness and boosting the overall flavor.
Step 7: Top the Pies
Roll out any remaining pie crust and cut it into shapes or strips for a lattice effect. Place these decorative tops over each filled shell. This not only looks charming and professional but also allows steam to escape during baking.
Step 8: Bake and Cool
Bake the pies in the preheated oven for 18 to 23 minutes until the crust is a stunning golden brown and the filling is bubbling through the vents. Once out of the oven, let the pies cool for 10 to 15 minutes in the pan before carefully lifting them out and transferring to a wire rack to cool completely. This step is crucial to let the filling set perfectly.
How to Serve Mini Apple Pies in Muffin Tins Recipe
Garnishes
These mini pies sing on their own, but a scoop of vanilla ice cream or a drizzle of caramel sauce can take them to the next level of comforting indulgence. A sprinkle of powdered sugar adds a pretty snowy finish perfect for any occasion.
Side Dishes
Pair your mini pies with a hot cup of coffee, a chai latte, or a spiced cider to enhance the warm notes of this dessert. For a light contrast, fresh whipped cream or a side of sharp cheddar cheese creates an unexpectedly delightful flavor balance.
Creative Ways to Present
Serve your Mini Apple Pies in Muffin Tins Recipe right in the muffin pan for a rustic, casual look, or transfer them onto a pretty platter lined with parchment paper for a more elegant presentation. You can even wrap them individually in parchment and tie with a ribbon for a charming gift idea!
Make Ahead and Storage
Storing Leftovers
After enjoying your mini pies, wrap any leftovers tightly with plastic wrap or store them in an airtight container. They keep well at room temperature for up to two days, making them an easy grab-and-go treat.
Freezing
If you want to save some for later, these mini pies freeze wonderfully. Wrap each pie individually in plastic wrap then aluminum foil, and freeze for up to 2 months. When ready to enjoy, thaw overnight in the fridge.
Reheating
Warm your mini pies in a preheated oven at 350°F (175°C) for about 10 minutes to re-crisp the crust and refresh the filling’s warmth. Avoid the microwave if you want to keep that satisfying flakiness intact.
FAQs
Can I use other types of apples for this Mini Apple Pies in Muffin Tins Recipe?
Absolutely! While Granny Smith and Honeycrisp are excellent choices for their balance of tartness and sweetness, feel free to mix or match your favorite apple varieties. Just make sure they’re firm enough to hold up during baking.
Do I have to add butter to the filling?
Butter is optional but highly recommended. It melts into the filling as the pies bake, creating a richer and more luscious texture. However, you can skip it if you prefer a lighter version.
Can I make the mini pies without lattice tops?
Yes! If you want a simpler version, you can skip the lattice or cutout tops altogether and just bake the pies open-faced. They’ll still look adorable and taste amazing.
How long can I store these mini pies before baking?
You can prepare the crusts and filling ahead of time, assembling the pies and storing the muffin pan covered in the fridge for up to 24 hours before baking. This makes your Mini Apple Pies in Muffin Tins Recipe perfect for meal prep or hosting.
What’s the best way to prevent the crust edges from burning?
If you notice your crust edges browning too quickly, cover them loosely with foil halfway through baking. This will protect the edges while allowing the filling to finish cooking perfectly.
Final Thoughts
There’s something truly magical about these Mini Apple Pies in Muffin Tins Recipe—they capture all the soul-warming charm of traditional apple pie in a perfectly bite-sized form. Whether you’re making them for a cozy family dessert or a festive party favor, they’re sure to bring smiles to every table. So grab your rolling pin and muffin tin and dive right in; these mini pies are waiting to become your new favorite treat!
Print
Mini Apple Pies in Muffin Tins Recipe
- Prep Time: 15 minutes
- Cook Time: 20 minutes
- Total Time: 55 minutes
- Yield: 12 mini pies
- Category: Dessert
- Method: Baking
- Cuisine: American
Description
This Mini Apple Pies recipe delivers perfectly individual-sized pies, bursting with a classic cinnamon-spiced apple filling enveloped in flaky, buttery crust. A charming twist on traditional apple pie, these mini treats are ideal for parties, holidays, or anytime you want a delightful, portable dessert. Made with simple ingredients and baked in a muffin pan, they offer convenience without compromising on taste or presentation.
Ingredients
Pie Crust
- 2 pie crusts (homemade or store-bought)
Apple Filling
- 2 ½ cups chopped apples (315 grams)
- ¼ cup granulated sugar (50 grams)
- 2 tablespoons all-purpose flour (15 grams)
- 1 teaspoon ground cinnamon
- 1 teaspoon pure vanilla extract
- ⅛ teaspoon ground nutmeg
Additional
- 1 tablespoon unsalted butter (15 grams), optional
Instructions
- Prepare the Oven and Your Tools: Preheat your oven to 425°F (220°C). Lightly flour your work surface to prevent the dough from sticking during rolling and cutting.
- Roll and Cut the Pie Crust: Roll out the pie crusts to about 1/8-inch thickness. Using a 3.5-inch cookie cutter or cup, cut out 12 circles from the dough. Re-roll any leftover dough to make more circles until you have 12 total.
- Shape the Mini Pie Shells: Press each dough circle gently into the cavities of a standard 12-count muffin pan to form mini pie shells. Ensure each fits snugly without tearing. Put the muffin pan and any extra dough back into the refrigerator while you prepare the apple filling.
- Prepare the Apple Filling: In a large bowl, combine chopped apples, granulated sugar, all-purpose flour, ground cinnamon, pure vanilla extract, and ground nutmeg. Stir everything together until the apples are evenly coated with the spiced mixture.
- Fill the Pie Shells: Remove the muffin pan from the refrigerator. Spoon the apple filling evenly into the dough-lined muffin cups, using about 3 tablespoons per cup for consistent filling amounts.
- Add Butter: Dice the unsalted butter into 12 small pieces. Place one small piece of butter on top of the apple filling in each mini pie to enrich flavor and add moisture.
- Top the Pies: Retrieve leftover pie crust from the fridge. Cut out small decorative shapes or lattice strips and place them atop each mini pie for an attractive finish.
- Bake: Place the muffin pan in the preheated oven and bake for 18 to 23 minutes until the crust turns golden brown and the apple filling bubbles visibly.
- Cool: Remove the pies from the oven and let them cool in the muffin pan for 10 to 15 minutes. Carefully lift out each mini pie and transfer to a wire rack to finish cooling before serving for best texture and flavor.
Notes
- You can use either homemade or store-bought pie crusts depending on your preference for convenience or freshness.
- Chilling the dough-lined muffin pan before filling helps maintain the crust shape and prevents shrinking during baking.
- Using a crust cutter that is about 3.5 inches ensures the perfect size for single serving mini pies.
- Adding small butter pieces on top of the filling enhances richness and helps achieve a glossy finish.
- Decorative crust tops can be customized as lattice strips, small shapes, or left plain based on your aesthetic preference.
- Allow pies to cool properly before serving to prevent burning and to let the filling set for easier eating.

