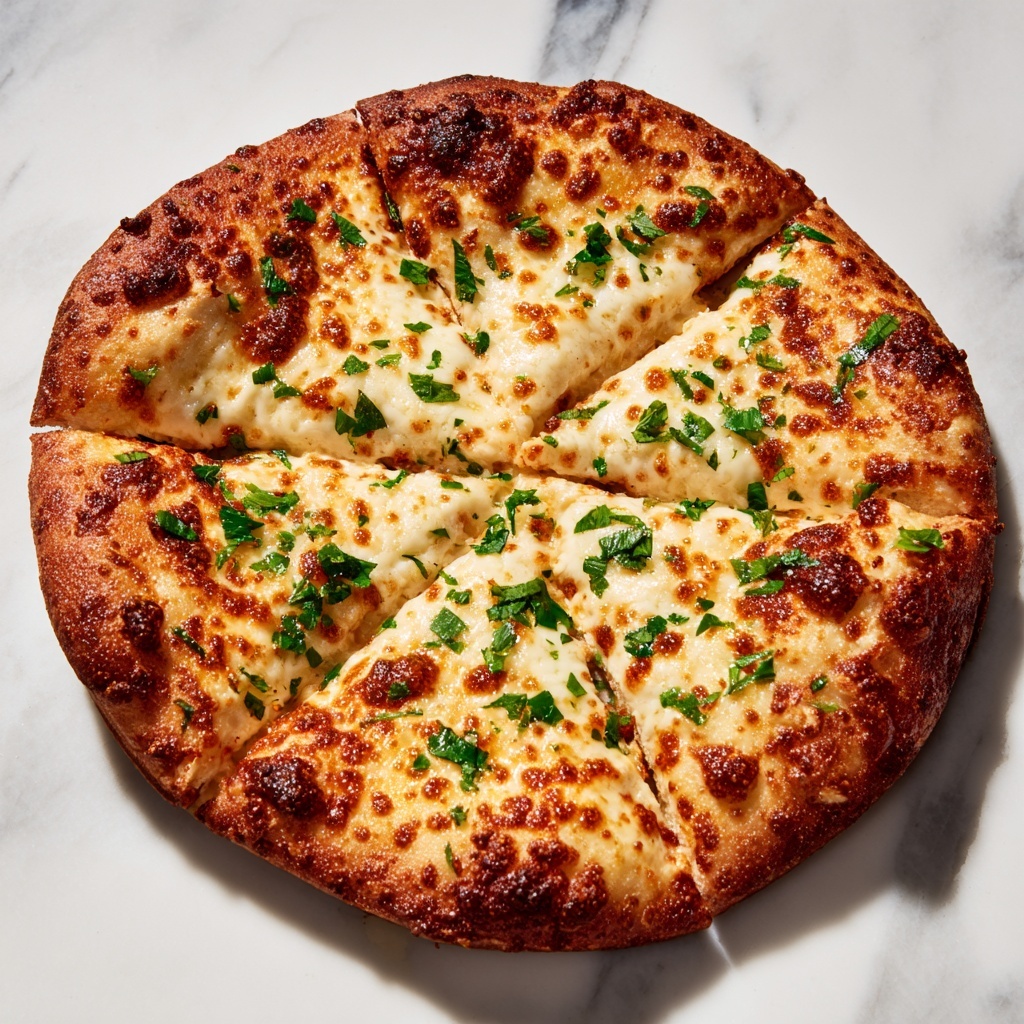
If you are passionate about bold flavors mingling with a crispy, golden crust, then this Roasted Garlic Chicken and Herb Pizza Recipe is going to become your new go-to comfort food. Imagine tender shredded chicken infused with the deep, mellow sweetness of roasted garlic, layered with creamy cheeses and fresh herbs on a perfectly charred pizza dough. This recipe is a delightful harmony of rustic charm and sophisticated taste, making every bite feel like a warm hug from your favorite chef.
Ingredients You’ll Need
Gathering the right ingredients is surprisingly simple yet absolutely critical to making this pizza sing with flavor. Each element brings its own unique character, from the creamy ricotta to the fragrant basil and oregano that brighten every mouthful with garden-fresh notes.
- Pizza dough: Whether store-bought or homemade, this forms the hearty base that crisps beautifully in the oven.
- Boneless, skinless chicken breast: Cooked and shredded for tender, protein-packed goodness that’s perfect for topping.
- Head of garlic (roasted): Roasting transforms garlic into a soft, buttery spread bursting with rich, nutty flavor.
- Olive oil: A drizzle that enhances moisture and helps all the ingredients meld together perfectly.
- Mozzarella cheese: Melts to a gooey, stringy delight that holds all the toppings in place.
- Ricotta cheese: Adds a creamy, mild tang that balances the richer flavors beautifully.
- Grated Parmesan cheese: Sprinkled for a sharp, savory punch that elevates the overall taste.
- Fresh basil, chopped: Bursting with sweet, aromatic freshness that complements the herbs and garlic.
- Fresh oregano, chopped: Adds an earthy, slightly peppery edge to the topping blend.
- Salt and pepper: Essential for seasoning and bringing out the natural flavors.
How to Make Roasted Garlic Chicken and Herb Pizza Recipe
Step 1: Roast the Garlic
Begin by roasting a whole head of garlic to unlock its sweetest, creamiest flavor. Slice off the top to expose the cloves, drizzle with olive oil, sprinkle with salt, and wrap tightly in foil. Bake at 400°F (200°C) for about 30-40 minutes until the cloves are golden and soft enough to mash into a spread. This step transforms raw garlic’s sharpness into a luscious, mellow base that defines this pizza.
Step 2: Prepare the Chicken
Use pre-cooked chicken breasts for convenience, shredding them into bite-sized pieces. If you’re cooking fresh chicken, poach or grill it with a pinch of salt and pepper until juicy and tender, then shred. This juicy chicken acts as the hearty topping that pairs perfectly with the roasted garlic’s richness.
Step 3: Assemble the Pizza Dough
Roll out your pizza dough onto a floured surface to your preferred thickness, then transfer it to a baking stone or sheet. Give the dough a light brush with olive oil to encourage a crispy, golden crust once baked.
Step 4: Build the Flavor Layers
Spread the roasted garlic evenly across the dough with the back of a spoon – it works as a flavorful sauce base. Next, dot the surface with dollops of ricotta cheese for creamy pockets, followed by shredded mozzarella for meltiness. Scatter the shredded chicken over the top, allowing every slice to have hearty bursts of tender protein. Finish by sprinkling Parmesan and the chopped fresh herbs, which add vibrant flavor and a delicious aroma.
Step 5: Bake to Perfection
Pop your pizza in an oven preheated to 475°F (245°C) and bake for 12-15 minutes until the crust is golden brown, the cheese bubbles, and the herbs become fragrant. Keep an eye on it to avoid burning, but don’t rush—the wait is part of the joy!
How to Serve Roasted Garlic Chicken and Herb Pizza Recipe

Garnishes
For an elegant touch, finish the pizza with a light drizzle of extra virgin olive oil and a sprinkle of freshly cracked black pepper. Some fresh basil leaves on top add a pop of color and freshness that your taste buds will thank you for.
Side Dishes
This pizza pairs wonderfully with a simple mixed green salad dressed lightly with lemon vinaigrette. The acidity and crunch provide a perfect counterbalance to the pizza’s creamy richness. For a heartier meal, consider serving alongside roasted seasonal vegetables or a warm bowl of tomato basil soup.
Creative Ways to Present
Try slicing the pizza into smaller, appetizer-sized pieces for parties or game nights. You can also serve it with a variety of dipping sauces like garlic aioli or spicy marinara for an interactive eating experience that’s fun and delicious.
Make Ahead and Storage
Storing Leftovers
Store any remaining pizza in an airtight container in the refrigerator for up to three days. This keeps the toppings fresh and the crust from getting soggy, ensuring a tasty encore anytime you need a quick meal.
Freezing
If you want to save your Roasted Garlic Chicken and Herb Pizza Recipe for later, wrap it tightly in plastic wrap and foil before freezing. It can be frozen for up to two months. When ready to eat, thaw overnight in the fridge for best results.
Reheating
Reheat leftovers in a preheated oven at 375°F (190°C) for 8-10 minutes to restore crispiness in the crust and warm, melty cheese. Avoid microwaving as it tends to make the crust rubbery and greasy.
FAQs
Can I use pre-made roasted garlic or must I roast it myself?
Pre-made roasted garlic is definitely a convenient option, but roasting your own fresh garlic elevates the flavor significantly. The process makes the garlic sweet and soft, which pairs beautifully with the chicken and herbs.
What if I don’t have fresh herbs on hand?
Dried herbs can be used in a pinch, but fresh basil and oregano truly brighten the pizza’s flavor. Use about one-third the amount of dried herbs since they are more concentrated.
Is it necessary to use all three cheeses?
Each cheese has a role: mozzarella melts wonderfully, ricotta adds creaminess, and Parmesan delivers sharp, nutty notes. You could modify based on preference, but combining all three makes this pizza uniquely delicious.
Can I make this pizza vegetarian?
Absolutely! Simply omit the chicken and add more vegetables like roasted mushrooms, spinach, or artichokes. The roasted garlic and herbs will still provide plenty of flavor.
What type of dough works best for this recipe?
Any pizza dough you enjoy works well, but a thin, crispy crust complements the rich toppings best. You can use store-bought dough or try homemade for a personalized touch.
Final Thoughts
I truly hope you give this Roasted Garlic Chicken and Herb Pizza Recipe a try—it’s a wonderful way to bring comfort and flavor into your kitchen with simple ingredients and heartfelt preparation. Whether it’s a casual dinner or a special occasion, sharing this pizza with loved ones is always a win. Happy cooking and even happier eating!
Print
Roasted Garlic Chicken and Herb Pizza Recipe
- Prep Time: 20 minutes
- Cook Time: 40 minutes
- Total Time: 1 hour
- Yield: 4 servings
- Category: Pizza
- Method: Baking
- Cuisine: Italian
Description
This Roasted Garlic Chicken and Herb Pizza combines the rich, mellow flavor of roasted garlic with tender shredded chicken and a blend of fresh herbs on a crispy pizza crust. Topped with a mix of mozzarella, ricotta, and Parmesan cheeses, this homemade pizza offers a deliciously satisfying meal that’s perfect for a family dinner or a casual get-together.
Ingredients
Pizza Base
- 1 pizza dough (store-bought or homemade)
Toppings
- 1 lb boneless, skinless chicken breast, cooked and shredded
- 1 head garlic, roasted
- 1 tablespoon olive oil
- 1 cup shredded mozzarella cheese
- 1/2 cup ricotta cheese
- 1/4 cup grated Parmesan cheese
- 1 tablespoon fresh basil, chopped
- 1 tablespoon fresh oregano, chopped
- Salt and pepper, to taste
Roasted Garlic
- 1 head garlic
- 1 tablespoon olive oil
- Salt, to taste
Instructions
- Roast the Garlic: Preheat your oven to 400°F (200°C). Slice the top of the garlic head to expose the cloves, drizzle with olive oil, sprinkle lightly with salt, wrap in foil, and roast in the oven for about 30-40 minutes until soft and caramelized. Remove from oven and allow to cool; then squeeze out the roasted garlic cloves and mash them into a paste.
- Prepare the Chicken: Cook the chicken breasts thoroughly, either by boiling, baking, or poaching, then shred them into bite-sized pieces using forks or your hands.
- Preheat the Oven for Baking Pizza: Increase the oven temperature to 475°F (245°C) to prepare for baking the pizza. If you have a pizza stone, place it in to heat.
- Prepare the Dough: Roll out the pizza dough on a floured surface to your desired thickness and place it on a baking sheet or preheated pizza stone.
- Assemble the Pizza: Brush the pizza dough lightly with olive oil, then evenly spread the roasted garlic paste over the base. Distribute the shredded chicken on top, sprinkle mozzarella, dollop ricotta cheese, and sprinkle grated Parmesan. Season with salt and pepper, then sprinkle the chopped fresh basil and oregano over the top.
- Bake the Pizza: Bake in the preheated oven for 12-15 minutes, or until the crust is golden and crisp and the cheeses are melted and bubbling.
- Serve: Remove the pizza from the oven, let it cool slightly, slice it into 4 or more servings, and enjoy while warm.
Notes
- Ensure the chicken is fully cooked before shredding to maintain food safety.
- Roasted garlic adds sweetness and depth of flavor, but you can adjust the quantity to taste.
- Fresh herbs give a bright flavor; dried herbs can be used but adjust quantities as they are more concentrated.
- Using a pizza stone helps achieve a crispier crust.
- Leftover pizza can be stored in the refrigerator for up to 3 days.

