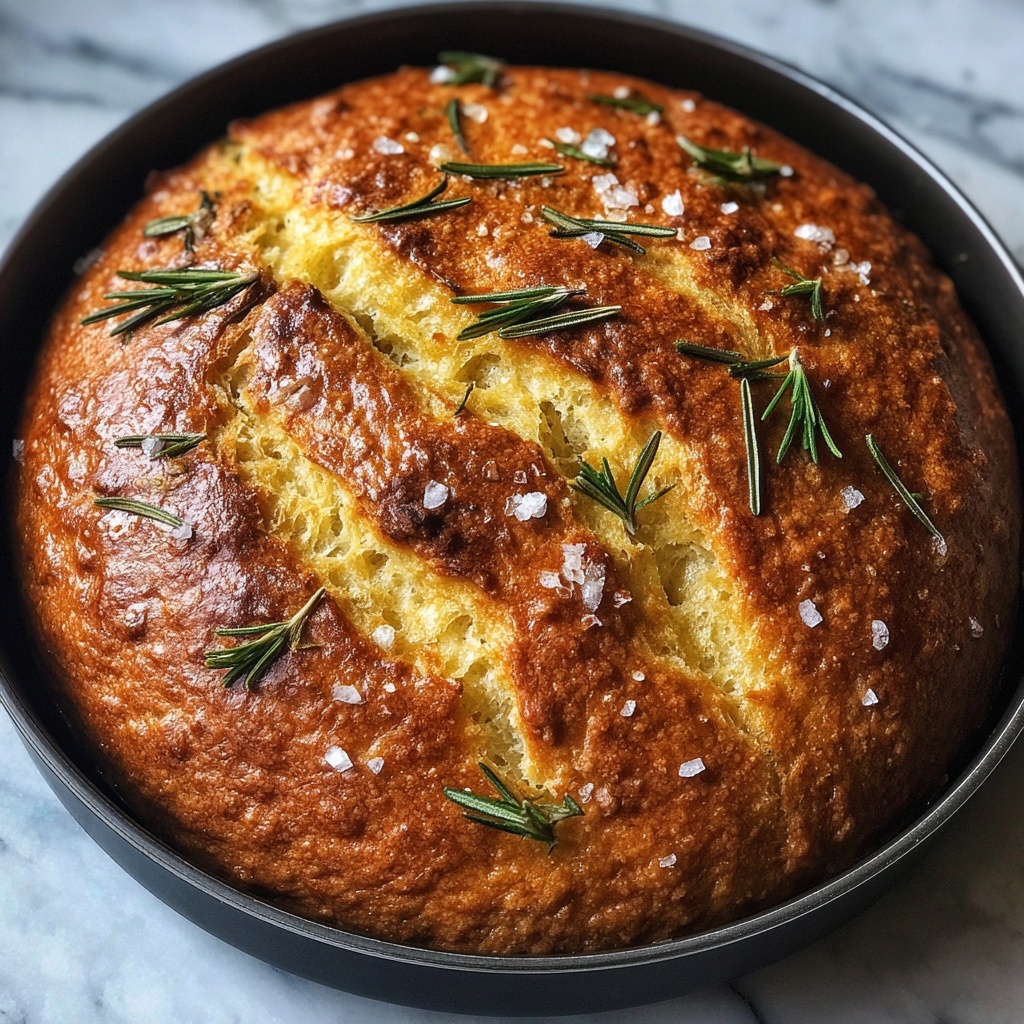
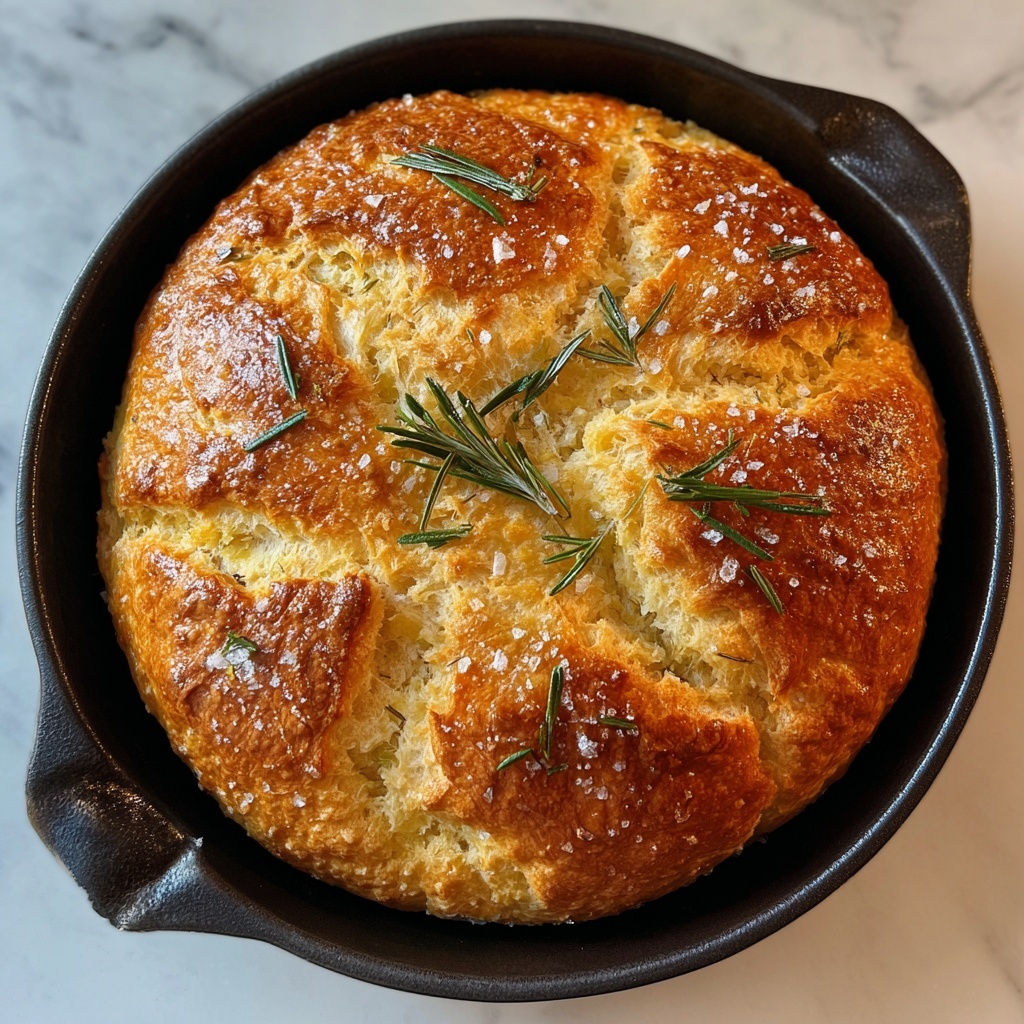
If you have ever dreamed of baking a warm, aromatic loaf that feels like a hug in every bite, this Rustic No-Knead Rosemary Garlic Bread Recipe is exactly what you need. It’s a simple, hands-off approach to bread that lets time and quality ingredients do all the magic. With the fragrant punch of fresh rosemary and the comforting depth of garlic, this loaf emerges crusty on the outside and pillowy soft inside, perfect for sharing with friends or savoring on your own. Trust me, once you try this Rustic No-Knead Rosemary Garlic Bread Recipe, it will become a beloved staple in your kitchen that’s both impressive and effortless.
Ingredients You’ll Need
Getting started with this Rustic No-Knead Rosemary Garlic Bread Recipe is wonderfully straightforward. Each ingredient plays a crucial role—from building the structure of the bread to infusing that irresistible flavor and creating the perfect rustic crust.
- 3 cups all-purpose flour: The base of your bread, providing the necessary gluten for structure and softness.
- 3 cloves garlic, minced: Adds a fragrant, savory warmth that infuses every bite with a delicious punch.
- 1 tablespoon finely chopped fresh rosemary: This herb brings a fresh, piney aroma and flavor that pairs beautifully with garlic.
- 1 1/4 teaspoons kosher salt: Enhances flavor and controls yeast fermentation, essential for balanced taste.
- 3/4 teaspoon freshly ground black pepper: Lends a subtle heat and depth to uplift the bread’s flavor profile.
- 1/2 teaspoon instant yeast: The magic ingredient that gently makes your dough rise without any kneading.
- 1 1/2 cups water, at room temperature: Hydrates the flour and activates the yeast, ensuring a tender crumb.
- 2 tablespoons cornmeal (for sprinkling): Prevents sticking and adds a lovely texture to the bottom crust in the skillet.
How to Make Rustic No-Knead Rosemary Garlic Bread Recipe
Step 1: Mix the Dough
Start by combining your flour, minced garlic, rosemary, salt, pepper, and yeast in a large bowl. Then pour in the water and stir everything together. The dough will be quite wet and sticky—that’s exactly what you want! This loose texture is the secret behind the bread’s delicate crumb and rustic charm.
Step 2: First Rise
Cover your bowl tightly with plastic wrap and let the dough rest at room temperature for about 18 to 24 hours. During this time, the dough develops flavor and bubbles will appear on the surface, signaling it’s ready for the next step. Patience pays off tremendously here.
Step 3: Prepare the Skillet
Before shaping your dough, lightly oil a 10-inch cast-iron skillet or use a nonstick spray, then sprinkle the bottom with cornmeal. This ensures your loaf won’t stick and gives the base a lovely, crunchy texture that’s signature to rustic bread.
Step 4: Shape the Dough and Second Rise
Turn the dough out onto a floured surface and gently shape it into a round loaf. Place this dough ball in your prepared skillet, cover it with a dishtowel, and let it rise again at room temperature for about 2 hours or until it doubles in size. This step adds lovely volume and fluffy softness inside.
Step 5: Bake
Heat your oven to 450 degrees Fahrenheit (232 Celsius) and then place the skillet inside. Bake the bread for 30 to 40 minutes until it’s a deep golden brown and sounds hollow when tapped. The baking process develops that irresistible crust that’s crunchy yet tender and packed with flavor.
Step 6: Serve
Let the bread cool just slightly before slicing so you don’t lose any precious moisture. Then dig in! This Rustic No-Knead Rosemary Garlic Bread Recipe shines warm and fresh from the oven, perfect for soaking up olive oil or complementing your favorite meals.
How to Serve Rustic No-Knead Rosemary Garlic Bread Recipe

Garnishes
This bread is already packed with flavor, but you can enhance it with simple garnishes. A drizzle of high-quality extra virgin olive oil right after baking or a sprinkle of flaky sea salt adds an elegant touch. Fresh sprigs of rosemary served alongside create a beautiful and aromatic presentation.
Side Dishes
The versatility of this Rustic No-Knead Rosemary Garlic Bread Recipe means it pairs wonderfully with a variety of dishes. Serve it alongside a vibrant salad, a bowl of comforting soup, or your favorite pasta dish. Its herby, garlicky notes make it the perfect dipper and companion on any dining table.
Creative Ways to Present
For a cozy gathering, slice the bread and arrange it in a basket lined with a linen napkin, inviting guests to help themselves. Or turn thick slices into crostini by toasting and topping with whipped ricotta and roasted tomatoes for a delightful appetizer. The rustic look of the loaf itself always makes any meal feel homey and special.
Make Ahead and Storage
Storing Leftovers
After enjoying your fresh bread, store any leftovers in a paper bag at room temperature to keep the crust crisp while allowing the interior to stay tender. Avoid plastic bags, which can make the crust soggy. The bread is best eaten within 2 days for optimal texture and flavor.
Freezing
If you want to extend the life of this Rustic No-Knead Rosemary Garlic Bread Recipe, slice the bread first and wrap it tightly in plastic wrap before placing it in a freezer-safe bag. Frozen properly, it will keep fresh flavor and texture for up to 3 months.
Reheating
To revive the bread’s crust and warmth, preheat your oven to 350 degrees Fahrenheit (175 Celsius). Wrap the loaf or slices loosely in foil and heat for about 10-15 minutes. For crispier crust, remove the foil for the last few minutes.
FAQs
Can I use dried rosemary instead of fresh in this recipe?
Yes, you can substitute dried rosemary, but reduce the amount to about one teaspoon since dried herbs are more concentrated. Fresh rosemary provides a fresher, more vibrant flavor that really shines in this bread.
Why does the dough need to rest for so long?
The extended resting period is crucial because it allows the yeast to slowly ferment the dough. This process develops deep, complex flavors and creates the airy texture without any kneading.
Can I make this bread gluten-free?
This Rustic No-Knead Rosemary Garlic Bread Recipe relies heavily on gluten formation, so it’s not suitable for a gluten-free version without extensive modifications and gluten-free flour blends designed for bread baking.
What if I don’t have a cast-iron skillet?
You can use any oven-safe heavy-bottomed pan or a Dutch oven. Just make sure it’s well-oiled and sprinkled with cornmeal to prevent sticking and help achieve that beautiful crust.
Is it possible to add other herbs or flavors?
Absolutely! Feel free to experiment by adding thyme, oregano, or even a bit of grated parmesan cheese. Just be mindful that adding too many extras might alter the dough consistency slightly, so adjust water or flour as needed.
Final Thoughts
This Rustic No-Knead Rosemary Garlic Bread Recipe is a shining example of how simple ingredients and a bit of patience can result in something truly spectacular. Whether you’re a seasoned baker or just starting out, this bread is a delightful and reliable way to fill your kitchen with irresistible aromas and share hearty, delicious moments around the table. I encourage you to embrace the process—it’s easier than you think and always worth it!
Print
Rustic No-Knead Rosemary Garlic Bread Recipe
- Prep Time: 15 minutes
- Cook Time: 35 minutes
- Total Time: 20 hours 50 minutes
- Yield: 8 servings
- Category: Bread
- Method: Baking
- Cuisine: American
Description
This Rustic No-Knead Rosemary Garlic Bread is a simple yet flavorful artisan-style loaf that requires minimal effort. Combining aromatic rosemary and garlic with a slow fermentation process, this bread develops a chewy crust and tender, airy crumb perfect for any meal or snack. The recipe uses a cast-iron skillet and requires no kneading, making it accessible for home bakers seeking delicious homemade bread without the fuss.
Ingredients
Dry Ingredients
- 3 cups all-purpose flour
- 1 tablespoon finely chopped fresh rosemary (or more to taste)
- 1 1/4 teaspoons kosher salt
- 3/4 teaspoon freshly ground black pepper
- 1/2 teaspoon instant yeast
- 2 tablespoons cornmeal (for sprinkling)
Fresh Ingredients
- 3 cloves garlic, minced
Liquid
- 1 1/2 cups water, at room temperature
Instructions
- Mix the Dough: In a large bowl, combine the all-purpose flour, minced garlic, chopped rosemary, kosher salt, freshly ground black pepper, and instant yeast. Add the room temperature water and stir with a wooden spoon or your hand until a wet, sticky dough forms, which should take about 30 seconds.
- First Rise: Cover the bowl tightly with plastic wrap and allow the dough to rest at room temperature for 18 to 24 hours. During this time, the dough will develop bubbles on the surface, indicating fermentation and rising.
- Prepare the Skillet: Lightly oil a 10-inch cast-iron skillet or spray it with a nonstick coating. Sprinkle the bottom with cornmeal to prevent the dough from sticking during baking.
- Shape the Dough & Second Rise: On a floured surface, gently shape the dough into a round loaf. Place it carefully into the prepared skillet. Cover the skillet with a clean dishtowel and let the dough rise at room temperature for 2 hours or until it has doubled in size.
- Bake: Preheat your oven to 450°F (232°C). Place the skillet with the risen dough in the oven and bake for 30 to 40 minutes until the bread is golden brown and sounds hollow when tapped on the bottom.
- Serve: Remove the bread from the oven and let it cool slightly in the skillet. Once cooled enough to handle, slice the bread and serve warm to enjoy the fresh rosemary and garlic flavors.
Notes
- Use a digital kitchen scale for best accuracy when measuring flour.
- Make sure the water is at room temperature to properly activate the yeast without killing it.
- Fresh rosemary can be substituted with dried, but reduce quantity to about 1 teaspoon since dried herbs are more concentrated.
- For a crustier loaf, allow the bread to cool completely on a wire rack before slicing.
- Cornmeal helps prevent sticking and adds a subtle crunchy texture to the crust bottom.
- You can store leftovers in an airtight container for up to 3 days or freeze slices for longer storage.


